Showing posts with label Vegetarian. Show all posts
5.20.2014

Algerian Makrout with Dates

As-Salaamu Alaykum,

Makrout with Dates - a north African cookie made from semolina, filled with dates, traditionally fried (you can bake them if you prefer) till golden then soaked in honey. This sweet is popular to serve on special occasions such as Ramadan and Eid but can be enjoyed all year round.

Orange blossom water used throughout the making ensures a well balanced flavour between bitter and sweet.
The flattened diamond shape and decoration can be achieved with the use of a special mold or by hand/using a knife as I did.

At some point i would like to post a photo tutorial but if you struggle with my written instructions this how to make makrout may help.
Having tested 2 recipes the one I'm sharing is my family's favourite. It uses less butter resulting in a firmer cookie but if you prefer a softer, richer version try Makrout with Dates and Honey by Christine Benlafquih.

Makrout with Dates (fried)

Recipe taken and slightly adapted from sihem at bonoise recettes
Yields: approximately 30 

Ingredients

400 grams coarse semolina
80 ml melted salted butter
+ or - 120ml orange blossom water (depends of absorption quality of semolina)
200 grams pitted dates or date paste
1/2 teaspoon cinnamon (cassia)
1 tablespoon orange blossom water
1 tablespoon melted unsalted butter
Oil (i used sunflower) for frying
Approximately 300 grams runny clear Honey with 1 tablespoons orange blossom water

Method

  1. In a small pan melt butter over medium heat, set aside. Measure semolina into a large bowl add the melted butter and mix (using right hand) until butter has coated every grain. Cover and set aside for 2 hours (1 hour minimum).
  2. Meanwhile pit dates and place in basket of couscousier and steam uncovered for 30 minutes. Remove and place into medium sized bowl along with cinnamon and orange blossom water mash with a fork until smooth. Set aside to cool.
  3. After 2 hours uncover bowl of semolina and slowly add orange blossom water in the same manner as you added the butter mix / rake with your hand/fingers DO NOT KNEAD but gently press together until you get a smooth dough adding more water (tap) if needed. Cover and set aside to rest for 1 hour. 
  4. Shape cookies by dividing date paste into 3-4 pieces,  oil your hands and work surface then roll into thin logs. Divide dough into 3-4 pieces.Taking 1 log of dough make a deep indentation that runs the length of the dough and place the date log inside. Carefully close the dough around the filling, then roll  the dough back and forth a few times on your work surface to seal and make the dough smooth again. Gently flatten dough with your hands and divide by making 1 inch / 2 cm diagonal cuts. To decorate score each makrout using the back of a knife.
  5.  In a wide frying pan place oil until it's about 2.5cm deep . Heat on a medium to high heat until hot, (test a scrap piece of dough it should quickly bubble and come to the surface). Place a small pot on stove and heat honey until it's hot then turn heat off and add orange blossom water, stir and set aside.Fry cookies in batches (5 cookies per batch) until golden brown this should only take a few minutes so keep your eyes on the pan. Once cooked immediately transfer to pot of honey and leave a few minutes whilst you fry another batch of cookies. Transfer honey soaked cookies to a strainer/sieve with a bowl underneath, leave to strain then transfer cookies to a large baking sheet to cool completely. Store in an airtight container at room temperature. 
Left over honey can be stored then used to drizzle over pancakes!

WARNING:-i apologise for any ads that may appear when clicking the sihem at bonoise recettes link above.
5.08.2014

Algerian Mesfouf - Steamed Couscous with Peas and Broad Beans

As-Salaamu Alaykum,

A simple and easy Algerian dish today, steamed couscous with peas and broad beans.

This dish is very light as there's no sauce but many Algerians eat this with buttermilk poured over or as a drink along with it.

Mesfouf with peas and broad beans

Serves 3

Ingredients

  • 250grams mix of Broad Beans and Peas frozen or fresh
  • 250grams Coucous
  • Water
  • Salt
  • Olive Oil / Butter
To Serve: Buttermilk/Leban/Maslanka

Method

  1. Boil a kettle full of water and carefully pour boiling water into bottom of couscousier. In the basket place your mix of peas and broad beans cover, reduce heat to simmer and steam  for 15 minutes. 
  2. In the mean time measure out your couscous into a large bowl, add a good glug of olive oil about one and half tablespoons and using a fork (or your right hand- the traditional way) mix into the couscous in a circular motion until all grains are coated, add 1/3 cup cold water or enough to just dampen the couscous and mix with a fork/hand again. Set aside.
  3. Once the peas and broad beans are cooked transfer to a bowl. Coat the bottom of the basket with a little olive oil (be careful the basket may still be hot) and then place back over the pot. Once you see the steam coming through the holes pour couscous into the basket, do not cover but steam for a good 30 minutes. 
  4. Once the couscous is tender but not mushy transfer to a bowl, add salt, olive oil/butter separate grains with a fork then stir in your steamed veg, check seasoning and then serve on it's own or with buttermilk.
4.23.2014

Strawberry Cake

 As-Salaamu Alaykum,

Spring, Summer = Strawberries! I don't really get the urge to eat strawberries any other time....does strawberry cheesecake count?

Granted, these aren't British Strawberries they won't be appearing until next month, in sha Allah.

I definitely made use of the ones I had putting them in the cake, frosting and as decoration. BUT....
All that glitters is not gold. 
The frosting was too sweet for the cake but I did like how the strawberry purée made it naturally light pink.
After thinking about it,my dislike could stem from the fact that I took two separate recipes for the cake and buttercream and put them together, assuming they would work just because they both contained strawberry!
I should have taken note when the recipe for the cake said this is a classic Victoria sandwich (uses equal quantities of butter, sugar and flour) with the addition of strawberries and cream(I used whole milk instead). The cake would be sweet enough on it's own or with some whipped cream so i won't be including the recipe for the frosting below.

Next time I make this cake I still want to cover the cake and make it explode with strawberry flavour so whipped cream marbled with some strawberry purée through should work.

Strawberry Cake


recipe loosely adapted from good to know

Ingredients

225grams unsalted butter, softened.
225grams caster sugar (golden)
3 large eggs
225grams self-raising flour
100ml whole milk 
135grams hulled strawberries, mashed or puréed 
1 tsp vanilla 

Method

  1. pre-heat the oven to 180C. Grease 1 20cm non stick spring form cake tin and line bottom with parchment paper.
  2. In a large bowl or your stand mixer, beat together butter and sugar together until well combined. (5minutes). Then add eggs one at a time ensuring each egg is thoroughly combined before adding the next (5minutes). Then add all the milk at once and slowly mix in.
  3. Fold in flour a third at a time until mixture is smooth.
  4. Mix strawberry purée and vanilla into cake batter.
  5. Pour the mixture into cake tin and bake on a middle shelf for 40 minutes or until a tooth pick inserted into middle of cake comes out clean. 
  6. Remove from oven and leave to cool in tin on a cooling rack for 20minutes before removing to cool completely. 
  7. Divide cake into 2 layers then fill, sandwich and decorate as desired. 
* You can always divide the cake batter between 2 20cm cake tins and half the cooking time. 

4.17.2014

Chocolate Orange Cupcakes With Orange Blossom Glacé Icing

As-Salaamu Alaykum,

Apologises for my lack of posting in recent months.

Here are some yummy cupcakes to re-break the blogging ice.

My first lot of Chocolate Orange Cupcakes I made way back in 2012 are still great but this time I chose to put a layer of orange blossom water glacé icing on top of each cupcake instead of a mountain of buttercream.  

The orange blossom water cuts through some of the sweetness of the cupcake, yet your sugar craving is well and truly satisfied. 

The baking cups I used were deep so the mix made 10 instead of the usual 12 and even then, they didn't rise to the top. This of course can be avoided if you use regular cases (liners). Do let me know if you try the recipe how it worked for you.

Chocolate Oranges Cupcakes With Orange Blossom Glacé Icing 

Makes 10-12 portions

Ingredients

Cupcakes

150 grams slightly salted butter (softened)
150 grams caster sugar (i prefer to use golden)
175 grams self-raising flour
25 grams cocoa powder 
3 medium size eggs
zest of 1 large orange (i used navel)
orange blossom water / orange juice

Glacé Icing

200 grams icing sugar 
1 teaspoon orange blossom water
1 -2 tablespoon water

Decorate

sprinkles of your choice

Method

  1. Pre-heat oven to 180C/gas mark 4. Lay out baking cups on a baking tray.
  2. Using an electric mixer or with a wooden spoon and bowl mix together butter and sugar till light and fluffy (5-10 minutes)
  3. Beat in the orange zest.Add eggs one at a time, ensuring each one is thoroughly incorporated before adding the next (5 minutes)
  4. Sift flour and cocoa powder into bowl and with a large metal spoon fold into the mixture until just incorporated. 
  5. Lightly mix in enough orange blossom water/orange juice until you get a dropping consistency.
  6. Using a 1/4cup or ice cream scoop, divide into baking cups. Bake in centre of oven for 15-20 minutes until firm to touch.
  7. Remove from oven and leave to cool.
  8. Once cupcakes are cool make the glacé icing; in a large bowl sift in icing sugar, add orange blossom water and 1 tablespoon water, gently mix adding more water as needed until it's just thick enough to coat the back of a spoon.
  9. Top each cupcake with a generous teaspoon of glacé icing and decorate with your favourite sprinkles.
2.05.2014

Fudgy Brownies (chocolate cherry)

(Mobile)

As-Salaamu Alaykum,

Baking in recent months has taken a bit of a back seat but that doesn't mean I've lost my passion for it, no siree!

These chewy crusted, rich fudgy Brownies engrained in me that yes you can be pushed for time, with children pulling at your apron strings (metaphorically speaking) and still make a really tasty treat in less than an hour.

I used a naturally flavoured cherry cocoa powder I bought from sugarandcrumbs they stock a variety of flavoured cocoas and icing sugars all a bit pricey but a little goes a long way as they are strongly flavoured.

The kids and I lapped these brownies up and although yes the cherry flavour was pleasant it was the texture that made these brownies irresistible.

I'm not a black sour cherry fan, which begs the question I ask myself, why go out of your flavour comfort zone? Well I did get inspired when I saw the hairy bikers make a B.F.G. (Black Forest Gateau) a while ago on TV and thought yes I'm onto a winner so when I was umming and arrring (Yorkshire talk for pondering) over which flavour to choose from the array of flavoured cocoa and icing sugars over at sugar and crumbs, cherry came in at no.1 I have to say I can't wait to try their coffee and caramel flavoured icing sugars next, insha'Allah

For the original recipe click here but as I used wholemeal flour and I reduced the sugar a little due to the flavoured cocoa containing dextrose here is my recipe.

Fudgy Chocolate Cherry Brownies

Ingredients

2grams baking soda
80ml sunflower oil
150ml boiling water
380grams white sugar
2 medium eggs
80ml sunflower oil
165grams wholemeal plain flour (allinsons brand I prefer)
2grams fine sea salt

Method

  1. Preheat oven to 350 degrees F (175 degrees C). Grease and flour a 9x13 inch pan.
  2. In a large bowl, stir together the cocoa and baking soda. Add 80ml sunflower oil and boiling water. Mix until well blended and thickened. Stir in the sugar, eggs, and remaining 80ml oil. Finally, add the flour and salt; mix just until all of the flour is absorbed. Spread evenly into the prepared pan.
  3. Bake in the preheated oven for 25-35 minutes, or until a toothpick inserted into the cake comes out clean. Allow to cool before cutting into desired portions.

12.13.2013

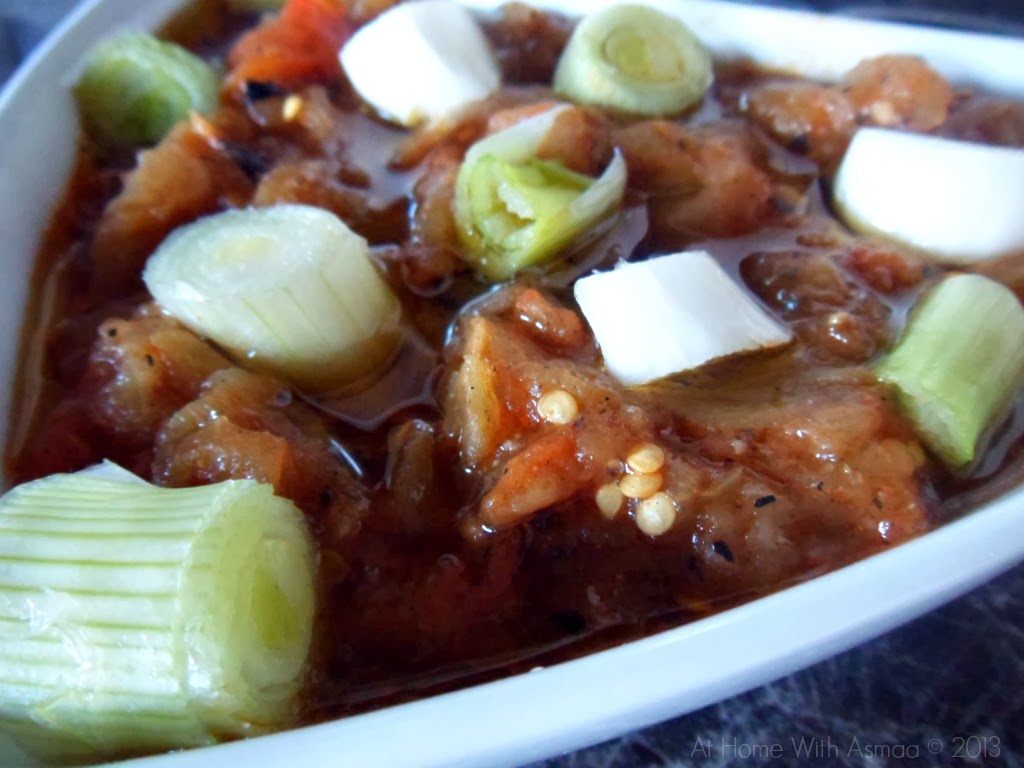
Hmiss - Algerian Style Flame Grilled Aubergine & Pepper Dip


As-Salaamu Alaykum / Hello Reader,

I'll be totally frank with you, this dip is quite time consuming, charring the vegetables on the stove top, peeling the blackened skins and scooping out every last bit of succulent 'meat' of the aubergine, chopping up, placing in pan and cooking over low heat until the flavours meld together and concentrate but after all that labour the result, full on smoky flavour, sweetness from the pepper with a hum of garlic and the fruity decadence that is olive oil it's irresistible served alongside a crusty baguette.

Chili / Harissa can be added at the second cooking phase to give it a kick although i do tend to stick to a clove of crushed garlic and slug of extra virgin olive oil.

I like topping this dip with more olive oil, spring onions and fresh herbs such as coriander however, I was all out of fresh herbs on this occasion. Olives and tuna are some other toppings you can try too.

I know this seems more of a summer dish especially in Algeria when these vegetables are cheap and plentiful, you could flame grill on your barbecue however, it's winter and I like to get warm by any means even if that's by the gas stove! it's a firm favourite in my home all year round and in sha Allah it will be in yours too.

What dish do you eat in all seasons?

Hmiss

Ingredients

  • 1 Aubergine 
  • 1 Pepper (i prefer to use red bell pepper as it gives a nice sweetness but any will do) 
  • 2 Salad Tomatoes
  • Extra Virgin Olive Oil
  • 1 Garlic Clove, crushed
  • Salt, Black Pepper, Cumin (to taste)
  • Chili / Harissa (optional)

Method

  1. Rinse and pat dry vegetables.
  2. Place all vegetables on gas stop tops on high heat flame grill all vegetables, turning every few minutes until all are blackened. 
  3. Tomatoes will be the first to cook, it's not necessary to blacken the tomatoes completely, just enough so the skins starts coming away from the flesh. 
  4. Pepper, Aubergine you really need to blacken skins all over, the aubergine will start to look like a piece of coal that's burnt i.e. white in places where it's burnt so much. 
  5. Place Pepper and Aubergine inside plastic food bag and leave for a few minutes to steam, this will help remove skin.
  6. Take Pepper and Aubergine out of the bag and remove skin from tomatoes and pepper, chop and place in small pan.
  7. Cut the aubergine straight down the middle and scoop out the flesh as close to the skin as possible and place in the pan along with pepper and tomatoes, crush together with fork.
  8. Add a slug of olive oil, crushed garlic, season with a pinch of salt, pepper and cumin (you can adjust later) and chili/harissa if using. Cover and cook on low heat for around 15 minutes.
Serve hot or room temperature topped with more olive and chopped spring onions / toppings of choice alongside bread.

Tips: 
  • Using your fingers I find works best for removing skins, you won't be able to remove all of the char but do as much as humanely possible. It's important you do not wash the vegetables at this point or you will loose all the flavour profile you have built up.
  • Alternatively grill vegetables in oven however, i personally don't think you can ever achieve the same level of smokiness flavour.
11.24.2013

Swiss / Jelly Roll

Swiss / Jelly Roll


As-Salamu Alaikum, 


If you didn't see this pic already (instagram) or you did, here it is again this time with the addition of a rather big, not so watered down, watermark?! 

This was my first time baking a swiss / jelly roll alhamdulillah I got a soft, sugary sponge and by using apricot jam instead of a classic red berry gave it a slightly different look, yeh not so much but apricot Jam is a favourite amongst my little Algerian Brits. 

The pic was took (phone camera) the the first slice, let me tell you the spiral shape got even better further along the roll but no time for snapping when you literally have to hide it before a toddler takes it into her own hands to get another piece.

If you want to have a go at making your very own (way better than the shop bought) head on over to  This Baker Girl Blogs: Swiss Roll From The Pink Whisk Guide To Cake Making  I promise if you follow those steps in her recipe you can't go wrong, inshaAllah.

P.s. I used self raising flour because I was out of plain and it still turned out well but next time I will make sure to have some plain flour in stock because there is enough air in the whipped eggs and sugar it doesn't need an additional raising agent.
10.23.2013

Tahini & Chocolate Chip Cookies [vegan]

As-Salamu Alaikum,


These cookies are the best 'vegan' recipe I’ve ever tried, you do not miss the butter or eggs at all.


Made using Tahini; a paste made from ground hulled sesame seeds and popularly used in middle eastern dishes such as hummus, tahini has 10 main health benefits:


1.       It’s rich in minerals such as phosphorus, lecithin, magnesium, potassium and iron. 

2.       It's a good source of Methionine, which aids in liver detoxification. 

3.       It’s one of the best sources of calcium out there. 

4.       It’s high in vitamin E and vitamins B1, B2, B3, B5 and B15. 

5.       Helps to promote healthy cell growth. 

6.       Prevent anemia. 

7.       Helps to maintain healthy skin and muscle tone. 

8.       It has 20% complete protein, making it a higher protein source than most nuts. 

9.       It's easy for your body to digest because of its high alkaline mineral content, which is great for assisting in weight loss. 

10.   It is high in unsaturated fat (good fat!)

Tahini is an acquired taste but throw in sugar and you can pretty much get everyone loving it, hence why Turkish halwa/halva is so popular but wow throw in chocolate chips and you have something your taste buds won’t be able to resist hence, I advise you make a double batch and share them with your friends/family immediately.


To give these cookies a true taste of north Africa I added a tablespoon of orange blossom water which worked well with the bitter dark chocolate and offset the sweet caramel taste from the unrefined brown sugar but if you want to sure you can leave it out, you can use some vanilla as per the original recipe or even rose water would still work but just remember with flavoured waters a little goes a long way by no means do you have to use a tablespoon it’s all down to personal preference and as most flavourings out there they are of different strengths so experiment.


You will adore these soft, dense and satisfyingly chewy cookies, they can even be slightly crisp on the edges if you bake them long enough.


I don’t know about you but I prefer cookies just a tad under baked (cookie= scant 1/4 cup bake 8-9 minutes) and with no egg in the recipe no worries of giving anyone food poisoning, big +


As I bake to inshaAllah please all, husband gets his with golden edges (cookie = scant 1/4 cup bake 10 minutes)


 I even made slightly smaller ones for the kids ( cookie = 2 tbsp bake 7-8minutes) not that they are happier having smaller ones...


I used 53% dark chocolate chips  in my cookies which I purchased from Chocolate Trading Company, it’s a great site for everyone with lots of details and ingredients list you are bound to find a chocolate or 2 to suit you. Of course, being Muslim I advise you choose those containing no alcohol.


What is your favourite type of cookie/biscuit?

Tahini & Chocolate Chip Cookies

adapted slightly from here
Makes around 12-18 (depending on size, see below)

1cup =250ml (British Standard)

 Ingredients


  • ¼  c caster sugar


  • ¾ c unrefined light brown sugar (I used muscovado), packed.


  • ⅔ c tahini (stir well before measuring)


  • ¼ c vegan margarine 


  • ¼ c made up of 1 tbsp orange blossom water and water.


  • 1½ c plain flour


  • ½ tsp baking soda


  • ½ tsp salt


  • ¾ c chocolate chips

  • Method


    1. Preheat oven to 375F/190C/170C Fan
    2. Line a cookie sheet with foil.
    3. In a large mixing bowl, cream together sugars, tahini, margarine.
    4. Beat in water and any flavourings you wish to add.
    5. In a small mixing bowl, sift together flour, baking soda, and salt.
    6. Add dry mixture to wet; beat to combine. Dough will be stiff but not dry.
    7. Fold in chocolate chips.
    8. Using an ice cream scoop (about a scant ¼ cup), place 6 balls of dough on a cookie sheet or using 2 tablespoons  of dough per cookie, place 8-10 balls of dough on a cookie sheet.
    9. Flatten balls to desired cookie thickness, mine were about 1/4-1/2cm thick.
    10. Bake between 7-10 minutes (see post for more details)
    11. Let cool on cookie sheet for a few minutes before transferring to a cooling rack to cool completely.
    12. Store in sealed container or cookie jar. Best eaten within 3days.
    *Disclosure: I wasn’t asked or paid to advertise any company in this post, all opinions are my own.

    Please note, after a friend tried this recipe using butter (instead of margarine) she found the cookies to be too dry. this might be due to a number of things i.e. the tahini being too thick, measuring inaccurately etc, therefore if you want to make this recipe non vegan please by all means go ahead use butter but if you find the mixture too dry you can add/beat in 1 egg or add more water to get the consistency right.
    9.30.2013

    Dreamlike Shortbread Biscuits

    As-Salamu Alaikum sisters, greetings dear reader,
    The recipe I followed for this delicious dreamlike shortbread was taken from Lorraine Pascales baking made 'easy' series and let me tell you it is just that, easy.

    3 standard ingredients of shortbread are butter, sugar and flour however, the addition of rice flour I feel gives shortbread a better sandy texture. If you haven't got rice flour to hand then i've read fine semolina can be used instead.

    Some recipes out there call for corn flour although I'm not sure if this can be used as a direct rice flour substitute it does seem more plausible to me than fine semolina, as corn flour and rice flour have a more similar texture. 
    You can't go wrong with Lorraines simple instructions for making and decorating,  get a fork and your pinchy fingers ready! Rich, crumbly and melt in your mouth goodness, Lorraine gives suggestions on how to give your shortbread a little flavour oomph with citrus zest or stem ginger! For full recipe click here
    P.S. I forgot to sprinkle caster sugar over the shortbread once it had baked, but don't worry if you make that mistake / choice it is definitely sweet enough without it
    P.P.S. Oh i almost forgot shortbread goes well with a nice cup of tea / coffee and don't mind any crumbs etc on the floor (yes that is my carpet lol) I had an excuse for not vacuuming that morning day... you guessed it I'd been baking shortbread......!
     Now I'm thinking of making..... millionaires shortbread, inshaAllah
    9.12.2013

    'Angel' Food Cake With Lemon Curd #GBBO

    As-Salamu Alaikum,


    Angel food cake with lemon curd is a must bake from this years series of The Great British Bake Off
    It was given to the Bakers by Paul and Mary as their first technical challenge. Needless to say really, this is not an easy recipe for a novice baker to attempt however with a little know how (different stages of whipping egg whites, how to make an angel food cake) and the right equipment (tube pan, egg separator, stand mixer or equivalent) it can make your experience a whole lot easier, trust me.

    'Angel' food cake is an American light sponge cake. Made from whisking egg whites, cream of tartar and any flavourings together to soft peak stage and then slowly adding sugar to form a firm, not stiff meringue. The job is done after gently folding in plain/cake flour along with more sugar, easy?!

    One great tip when separating eggs, is to do them 1 by 1 in another bowl first before adding each yolk free white to your main bowl, that way you will avoid that 1 broken yolk spoiling all your whites. At the very most you will loose 1 egg white maybe 2 if your like me and forget to put your egg white in the mixing bowl before separating another egg.

    Baking in an ungreased tube pan is very important so that the cake can cling to the sides of the pan this helps it rise plus the tube in the centre helps cook the cake evenly.


    Always, always, once your cake has baked turn the pan upside down as you do with a chiffon cake, this prevents the cake from falling in on itself and don't worry it is very unlikely your cake will fall out because you didn't butter your pan remember?

    This is not my first time making an Angel food cake but the second. My first attempt was barely edible, not only did I not use a tube pan but I didn't fold in my flour thoroughly so don't do as I did and be patient when folding in your flour, don't worry you won't loose all the air you built up in your meringue if you are gentle just try to work fairly quick, lets say within 5 minutes.


    Well they didn't really let this all American cake go out there without putting something British all over it, yes whipped cream but I was thinking more of Lemon Curd. Yes I did my research Fruit Curd originated in England back in the late 19th early 20th Century.

    Egg yolks that are leftover from separating go into a pan with sugar, lemon juice and zest to make your very own, far better than shop bought lemon curd.
    Sweet and Sour and Smooth (from the addition of Butter) you will produce more than enough curd to decorate the cake, so you can eat the rest as I did by the spoonful or use as a filling for cupcakes and I sometimes even spread it on toast!


    Creamy, Light, Sweet and Citrus this cake you can Bake at home for everyday and that special occasion.

    Passion fruit is called for to also top the cake, I couldn't get my hands on any but I feel raspberries would make a nice alternative.

    For the full recipe click here
    * I used a 9inch tube pan instead of the 10inch called for in the recipe
    ** I didn't use cream of tartar to stabilise my egg whites (makes them whip better) but if you want to I recommend the dr. oetker brand as it is made from unfermented grapes.

    6.22.2013

    Algerian Tamina: Toasted Semolina & Honey Dessert


    As-Salamu Alaikum / Peace be upon you Sister and Hello dear reader,

    Tamina is a very old Algerian recipe served usually to celebrate the birth of a new baby but can be made an enjoyed all year round especially when desiring something super sweet.

    It just so happens mashaAllah / as God willed, I gave birth little over a week ago to my third child, Zayd, he and I are both doing well Alhamdulillah/All praise and thanks be to God so I thought it would be a good idea to share this recipe on the blog.

    I am no expert on breastfeeding however, I've certainly found that consuming Semolina either in this dessert form or bread such as Kesra increases my milk production, so for all you breastfeeding mothers who are struggling in those first few days after birth, you have more than 1 child to feed  or you just want to increase your milk production for those growth spurts your little one goes through, This dessert is something I would recommend you try.


    My version of this Algerian classic is by no means the authentic Algerian Tamina recipe. I have used a dairy free substitute in place of butter in order for my 2year old daughter (has dairy allergy) to be able to enjoy this dessert along with the rest of the family but I really think it tastes just as good if not better as it is a little dare I say, healthier!

    Tamina

    Adapted from here

    Ingredients

    500 grams Coarse Semolina
    250 grams Butter or Vegan Margarine as the one pictured above
    250 grams Runny Honey
    2 tablespoons Orange Blossom Water
    Almonds, Sugar decorations to decorate (optional)

    Method

    Add semolina to a large non stick frying pan / skillet and turn on the heat to high, constantly stir the semolina grains to avoid burning.

    You want to toast the semolina until it's the same colour as sand it will take anyway between 10-20 minutes, once you smell the semolina toasting you may want to reduce the heat to medium/low so that you have more control i.e. that it doesn't burn and don't forget you can always pre-heat your frying pan which would reduce the time it takes to toast the semolina just I prefer or feel more at ease to bring the pan up to heat along with the semolina inside.


    Once your semolina as toasted transfer into a large bowl and set aside.  
    Melt the butter/vegan margarine in the frying pan.

    Add the Honey
    Add the Orange Blossom Water and Stir


    Return the Semolina to the frying pan

    and slowly mix all the ingredients together until it forms into what resembles damp/wet sand.

    Spoon into desired moulds, I used my silicone star cake cases but you can always be more traditional and serve it on small plates, decorate with nuts, cake decorations as desired.

    I made this tamina a few days before I gave birth, not much was left when I returned home from the hospital but alhamdulillah I managed to sneak in a few for breakfast (it's not really a breakfast staple in Algeria lol) one morning before labour day as some of instagram followers may recall the photo below....
    Until my next post in sha Allah / God Willing.......As-Salamu Alaikum / Peace Be Upon You
    
    6.04.2013

    Mini Vanilla Custard Slices

    As- Salamu Alaikum / Greetings Reader,

    My sincere apologises to any of my instagram followers who saw my pic of these mini vanilla custard slices many days ago now and have been waiting to hear more about them, well let me tell you they didn't take all this time to eat, they were gone within 24 hours = proof you need to make these delicious treats sometime soon, yes preferably when the sun isn't on show like it is here today here in the north of England, mashaAllah / As Allah  = God Willed.

    I don't think anything can beat dreamy, creamy vanilla infused custard, sandwiched between delicate, flaky layers of puff pastry and topped with sweet orange blossom perfumed icing.

    Also, the good news is they are 'mini' so you can eat 2 in one sitting without any guilt / shame!

    Mini Vanilla Custard Slices

    Makes 12

    Ingredients

    Puff Pastry

    500grams block of frozen puff pastry, thawed in the fridge overnight
    Plain flour, for work surfaces and rolling pin

    Filling

    batch of Crème Patissiere / Pastry Cream = Thick Custard

    Icing

    200grams icing/powdered sugar
    5teaspoons cold water OR 4 3/4 teaspoons water and 1/4 teaspoon orange blossom or rose water

    Method

    Pre-Heat Fan Oven to 200C

    On a lightly floured surface roll out your puff pastry block until it's about 50 x 35cm 1/4cm thick.

    Divide in half (a ruler and sharp knife come in handy for this) and place each half on it's own lined baking sheet and bake for on the 2 middle racks of your oven for 15-20minutes or until light golden in colour (you may wish to rotate the baking sheets half way through so you get even cooking and colouring)
     
    Remove puff pastry halves from oven, prick each, all over with a fork and place on a wire rack to cool completely.
     
    Make up a batch of crème patissiere and cool/chill in the fridge until your ready to assemble.
     
    To divide up your puff pastry equally, place one puff pastry half on top of the other, trim any curvy edges and divide up (ruler and serrated knife) into 12 pairs each puff pastry pair being about 3-4cm wide and 7-8cm in length.
     
    To fill, I find it easiest to pipe my crème patissiere onto the puff pastry bottoms, I do one row of piping and then another on top, quickly place the puff pastry lid on top then smooth / spread out the pastry cream around the sides using an angled palette knife. Repeat this step until you have filled all your 12 mini vanilla custard slices.
     
     
    Next make up your icing, I personally love anything flavoured with the hint of orange blossom water and it helps slightly cut through the sweetness of all the sugar, you could use rose water or lemon/orange juice too.
     
     
    I find it's best to put a generous teaspoon of icing onto the pastry lid and then being very careful not to rough up the puff! using a butter knife spread the icing until it covers the lid. Note: Please only use 5teaspoons of water, don't think as I did that it's too thick and add another teaspoon of water it will make your icing run slightly down the sides which makes for a nice photo and sticky fingers!
     
    Powered by Blogger.